
ASFROM Automatic Shoe Delasting Machine FAQ
ASFROM Automatic Shoe Delasting Machine FAQ
Automatic Shoe Delasting Machine Base Q&A
一.Product Application FAQs
Q1: What production‑process is the AS‑701 single‑station automatic up‑last machine used for?
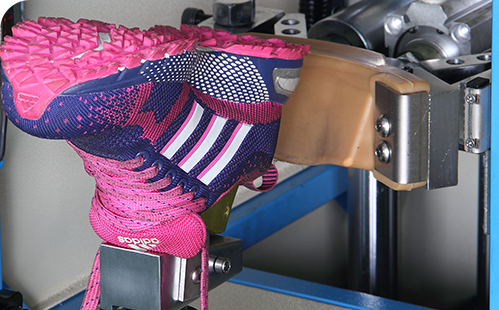
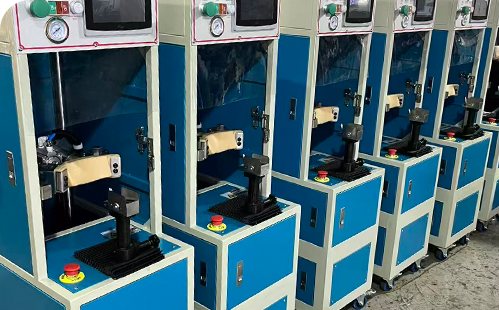
A1: AS‑701 is a single‑station pneumatic automatic de‑last machine for shoe‑making workshops. It automatically separates finished shoes from shoe lasts. It is compatible with men’s & women’s sports shoes, casual shoes, vulcanized shoes, children’s shoes and other mainstream footwear styles, widely deployed on post‑freezing production lines.
二. Core Features & Advantages FAQs
Q2: What are the main technical highlights of this de‑last machine?
A2:
- Simple operation with imported electric components: Operators only need to place finished shoes onto the last‑holding assembly. The distance between last‑seat assembly and push‑up assembly can be adjusted according to different shoe sizes.
- Single‑station head design: Compared with traditional hydraulic de‑last equipment, production capacity increases by 1.5 times. It reduces operator fatigue and improves overall workshop benefit.
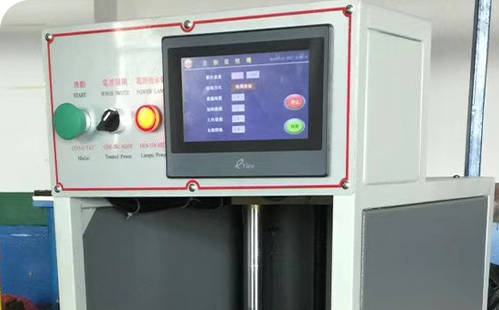
- Photoelectric induction & PLC automatic control: No foot‑pedal or manual start‑button is required. The machine triggers cycles automatically after shoe placement. Photoelectric delay time can be adjusted according to actual output requirements for high‑efficiency continuous work.
- Full‑cylinder pneumatic drive: Replaces traditional hydraulic de‑last machines. No driving motor is needed, which saves electric energy. It eliminates hydraulic oil purchase and regular oil‑change work to cut running costs.
- Rubber protective mold design: The push‑up de‑last assembly adopts durable rubber molds. Powerful up‑down movement avoids scratching or damaging shoe uppers and guarantees finished‑product quality.
三. What are the complete official specifications of AS‑701?
Q3: What are the complete official specifications of AS‑701?
A3:
| Item | Specification |
|---|---|
| Model | AS‑701 Single Station Automatic Up Last Machine |
| Air supply working pressure | 4‑6 KGS |
| Power supply | 220V / 50Hz / 1‑Phase |
| Overall dimensions (L×W×H) | 400 × 650 × 1360 mm |
| Net Weight | 160 KG |
四.On‑Site Installation & Environment Matching FAQs
Q4: What pre‑conditions are required before installation?
A4:‑ Power supply: Stable single‑phase 220V power supply; reliable protective earthing is mandatory.
‑ Air supply: Provide clean dry compressed‑air source, keep working pressure within 4‑6 KGS. Install filter‑regulator unit on air pipeline.
‑ Space allocation: Place on flat solid workshop floor. Reserve front operating space for loading/unloading shoes; keep side clearance for adjustment and maintenance.
‑ Environment: Ordinary shoe‑factory workshop environment; avoid heavy dust to protect photoelectric sensor, pneumatic cylinders and electrical components.
五.Standard Startup & Production Operation SOP FAQs
Q5: What is complete standardized operating procedure from power‑on to mass‑production?
A5:
- Pre‑start‑up inspection: Check power and earthing; connect compressed‑air pipeline, inspect joints for air leakage; test photoelectric sensor for blockage; check rubber molds for damage; verify movable assemblies move smoothly.
- Power‑on & parameter setup: Switch on 220V main power, open air‑supply valve. Adjust air pressure to 4‑6 KGS. Set photoelectric induction delay time according to production rhythm. Adjust spacing between last‑setting assembly and push‑up assembly to match current shoe size.
- Idle test‑run: Perform several empty cycles. Confirm pneumatic cylinder movement, photoelectric triggering and reset action work normally, no abnormal noise.
- Sample debugging: Place finished shoe with last onto positioning seat. Observe automatic de‑last cycle. Check whether shoe upper gets scratched. Fine‑tune spacing and delay parameters until de‑last effect meets requirements.
- Formal mass‑production: Continuously place shoes onto station, machine triggers automatically. Take off de‑lasted shoes after each cycle. Do random sampling inspection to check upper condition.
- Shift‑end shutdown: Stop feeding workpieces. Cut off compressed‑air supply and exhaust residual air in circuit. Switch off main power. Clean rubber mold and station surface of shoe scraps and dust.
⚠️ Safety warning: Do not put hands inside the moving working zone during automatic cycles to prevent pinching injury. Do not set air pressure higher than 6 KGS.
六.Common Abnormality & Trouble‑Shooting Tips FAQs
Q6: What frequent‑seen faults may happen in daily workshop, and quick check points for operators?
A6:
• Phenomenon 1: Machine does not trigger action after shoe placement Check points: Check if photoelectric sensor is covered by dust or shoe scraps; verify air‑supply pressure stays within 4‑6 KGS; inspect sensor wiring and PLC signal output.
• Phenomenon 2: De‑last force insufficient, shoe cannot separate smoothly from last Check points: Increase working air pressure properly; check rubber mold for severe wear; adjust spacing of positioning assemblies; check cylinder for internal air‑leakage.
• Phenomenon 3: Shoe upper gets scratched or damaged during de‑last process Check points: Inspect rubber mold surface for burrs, cracks or hard foreign bodies; re‑adjust assembly spacing; check if shoe is placed offset.
• Phenomenon 4: Cylinder moves slowly or jams Check points: Confirm stable air‑supply; check pipeline blockage; inspect cylinder seals aging.
⚠️ Warning: Operators shall NOT disassemble PLC, pneumatic cylinder and internal electric assemblies without professional‑technical guidance. Contact supplier‑technical‑support for complex faults.
七.Tiered Complete Routine Maintenance FAQs
Q7: What maintenance items need to be done daily / weekly / monthly?
A7:
✅Daily (before and after each production shift) Clean photoelectric sensor lens and rubber mold surface; check air‑pipe joints for leakage; test automatic trigger and full cycle action; clear shoe scraps on positioning assemblies.
✅Weekly Tighten loose mechanical mounting screws; apply lubricant for cylinder guide moving parts; inspect rubber mold for wear and tearing; check electrical terminal firmness.
✅Monthly Re‑calibrate photoelectric induction delay parameters; comprehensive inspection of pneumatic components and electric‑control system; replace heavily worn rubber mold protective parts.
八. DDelivered Accessories & Technical Documents FAQs
Q8: What items will be delivered together with the machine?
A8:
- Technical documents (paper hard‑copy + PDF electronic version): Complete English‑language operation manual, electrical schematic diagram, pneumatic circuit schematic diagram, spare‑parts list and common‑fault‑troubleshooting manual.
- Standard delivered accessories: A full set of standard‑tool kit for daily‑machine adjustment and maintenance work; quick‑connect air‑pipe fittings.
九. Warranty Scope & After‑Sales Technical Support FAQs
Q9: What is the exact warranty scope, and which parts are excluded?
A9:12‑month full‑machine warranty for non‑consumable parts, calculated from goods arrival at buyer’s premises.
Consumable‑wearing parts excluded from warranty: rubber de‑last mold, pneumatic seals, O‑rings, photoelectric sensor. Damage caused by over‑pressure operation, foreign‑object impact and unauthorized disassembly is not covered under warranty.
Q10: What after‑sales technical services are provided?
A10:
- Remote‑video debugging and remote‑fault‑diagnosis service.
- Online‑operator‑operation‑skill‑training guidance; door‑to‑door on‑site service can be arranged as required.
- Lifelong spare‑parts supply at factory‑cost price for customer follow‑up replacement.
- Process‑technical support: assist customers to adjust assembly spacing and induction‑delay parameters for different shoe sizes and shoe‑material constructions.
Supplementary note: This machine adopts mixed power: 220V for control system and compressed air for executing cylinders. Air pressure must always be kept between 4‑6 KGS.